The most useful anterior pelvic tilt exercises combine stretching and strengthening. Stretch the hip flexors with a kneeling psoas stretch and kneeling quad stretch, then train the muscles that tilt the pelvis back with pelvic tilts, glute bridges and dead bugs. Do the routine four to five times a week for at least six weeks.
Look at someone with a strong anterior pelvic tilt from the side and you will usually see the same picture: the belt line slopes down at the front, the lower back curves inward more than usual, and the belly and backside both push out. Many people notice it first in photos, or when their lower back feels tired after standing for a long time.
A small forward tilt is normal. In a study of 120 healthy young adults, 85% of the men and 75% of the women stood with some anterior pelvic tilt, and only a small minority were neutral or tilted backward.1 So the goal is not to force your pelvis into a perfectly level position. The goal is to have enough hip mobility and enough strength around the pelvis that you can move it freely and choose a comfortable position.
This guide explains what drives an exaggerated tilt, then gives you seven exercises with exact setup, cues, hold times and common mistakes.
What Anterior Pelvic Tilt Is
Your pelvis can rotate forward and backward around the hip joints. In an anterior tilt, the front of the pelvis drops and the back of the pelvis rises. Because the lower spine sits on top of the pelvis, this also increases the curve in your lower back.
Muscles on all four sides of the pelvis control this position:
- Pulling the front down: the hip flexors (psoas, iliacus and rectus femoris) and the lower back extensors
- Pulling the front up: the abdominals, the glutes and the hamstrings
When the hip flexors are stiff from long hours of sitting, and the glutes and lower abdominals rarely work hard, the balance shifts. The pelvis rests further forward, and you may find it hard to tuck it back even when you try.
A quick self-check
Stand with your back against a wall, heels about 5 cm from the wall. Your head, upper back and buttocks touch the wall. Slide one hand into the gap behind your lower back.
- If your hand slides in easily and you could fit more, your tilt may be on the larger side.
- Now try to flatten your lower back toward the wall by tightening your lower belly and glutes. If you can close most of the gap without bending your knees, you have good control. If you cannot, the exercises below are a good fit.
This is a rough check, not a diagnosis. Body shape, glute size and spinal shape all change what you feel.
Part 1: Stretches for the Front of the Hip
Start with the stretches. Stiff hip flexors make it harder to feel the strengthening exercises in the right places.
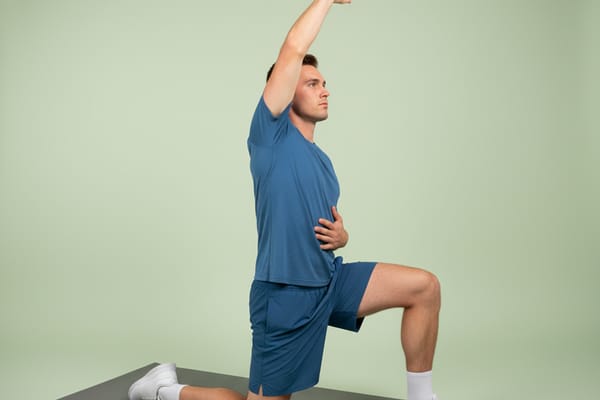
1. Kneeling Psoas Stretch
Targets: psoas, iliacus, front of the hip, side of the trunk
Setup:
- Kneel on a mat with a folded towel under your back knee.
- Step your right foot forward so both knees bend to about 90 degrees.
- Raise your left arm overhead and rest your right hand on your hip.
Cues:
- Before you move forward, tuck your tailbone down and tighten your left glute. You should already feel a stretch in the front of your left hip.
- Shift your hips forward only a few centimeters while you keep the tuck.
- Reach your left arm up and slightly to the right.
Hold: 45 to 60 seconds per side, two rounds.
Common mistake: Pushing the hips far forward and arching the lower back. This moves the stretch out of the hip and into the spine, which is the exact pattern you want to change.
Easier: Skip the arm reach and keep both hands on your hips. Harder: Place your back foot on a low step to add a stretch through the front of the thigh.
The tuck matters. In a 2024 crossover trial with 26 active adults, a half-kneeling stretch that added a posterior pelvic tilt reduced hip flexor resistance more than a standard version that only pushed the hips forward.2
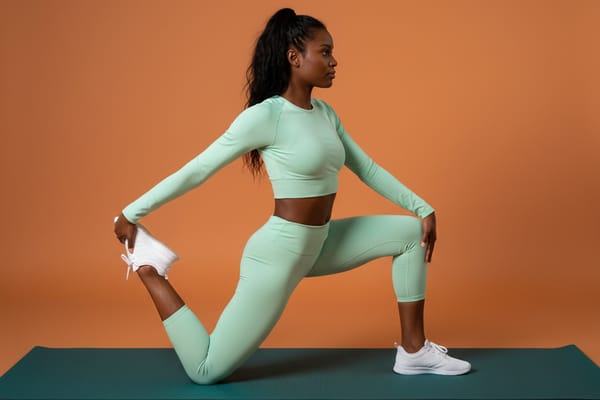
2. Kneeling Quad Stretch
Targets: rectus femoris, hip flexors
The rectus femoris crosses both the hip and the knee, so it needs a stretch that bends the knee while the hip stays extended.
Setup:
- Start in the same half-kneeling position, right foot forward.
- Reach back with your left hand and hold your left ankle or the top of your foot.
- Put your right hand on your front knee for balance.
Cues:
- Tuck your pelvis first, then draw your heel toward your glute.
- Keep your chest up and your ribs down. Do not let the front of your ribs flare open.
Hold: 30 to 45 seconds per side.
Common mistake: Letting the lower back arch as the heel comes in. If that happens, let the heel move away from the glute until you can keep the pelvis tucked.
Easier: Loop a strap or towel around the ankle instead of holding it. Harder: Do the stretch with the back foot against a wall or couch (the couch stretch). Our quad stretches guide covers this in more detail.
3. Child’s Pose for the Lower Back
Targets: lower back extensors
The lower back muscles also pull the pelvis forward. A relaxed rounding stretch gives them a break.
Setup: Kneel, sit your hips back toward your heels, reach your arms forward and rest your forehead on the floor or a cushion.
Cues: Breathe slowly into the back of your ribs. Let the lower back round with each exhale.
Hold: 60 seconds.
Easier: Put a pillow between your thighs and calves if your hips do not reach your heels.
Part 2: Strength Work for the Back of the Pelvis and the Core
Stretching gives you more available range. Strength work teaches you to use it. This is where most of the lasting change comes from.
4. Pelvic Tilt Press
Targets: lower abdominals, control of pelvic position
This is the basic skill for every other exercise in this section.
Setup: Lie on your back with your knees bent and feet flat, hip-width apart. Arms rest by your sides.
How to do it:
- Breathe out and gently draw your belly button toward your spine.
- Tilt your pelvis so your lower back presses into the mat. Your tailbone will lift slightly.
- Hold for one full breath, then release back to a small arch.
Reps: 2 sets of 10 to 12, slow.
Common mistake: Pushing with the legs or squeezing the buttocks so hard that the hips lift off the floor. The movement should come mainly from the lower abdominals.
Harder: Hold the pressed position for 10 seconds while you breathe normally.
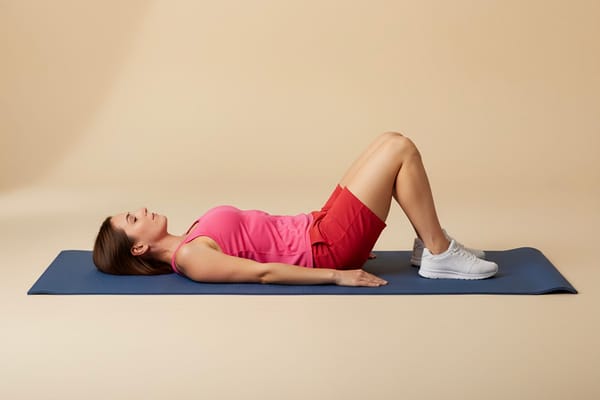
5. Glute Bridge
Targets: glutes, hamstrings
Setup: Same start position as the pelvic tilt press.
How to do it:
- Do a pelvic tilt first, so your lower back is flat.
- Keep that tilt and press through your heels to lift your hips until your body forms a straight line from knees to shoulders.
- Squeeze your glutes at the top for two seconds, then lower one vertebra at a time.
Reps: 3 sets of 10 to 12.
Common mistake: Lifting too high and arching the lower back at the top. Stop when your hips are in line with your knees and shoulders.
Easier: Lift only halfway. Harder: Single-leg glute bridge, with one leg extended toward the ceiling. Our glute stretches guide shows how to keep these muscles mobile as they get stronger.
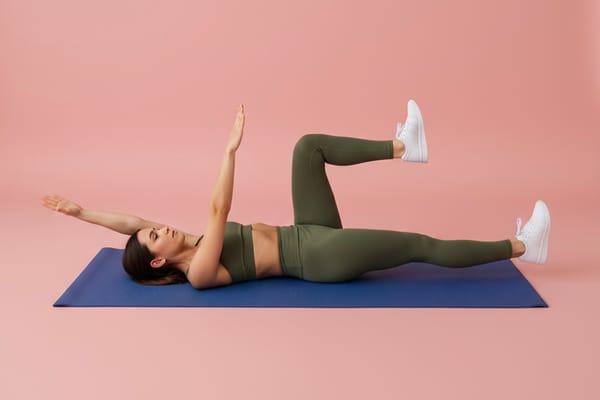
6. Dead Bug
Targets: deep abdominals, control of the pelvis while the legs move
Setup: Lie on your back with your arms reaching toward the ceiling. Lift your knees above your hips with the knees bent to 90 degrees.
How to do it:
- Press your lower back gently into the floor.
- Slowly lower your right arm overhead and straighten your left leg toward the floor at the same time.
- Stop before your lower back starts to lift. Return and switch sides.
Reps: 2 to 3 sets of 6 to 8 per side.
Common mistake: Moving fast or lowering the leg too far. If your lower back arches away from the mat, the exercise has stopped working your abdominals.
Easier: Keep the knee bent and only tap the heel to the floor. Harder: Hold the extended position for 5 seconds on each rep.
7. Bird Dog
Targets: glutes, back extensors, trunk stability
Setup: Start on hands and knees, shoulders over wrists and hips over knees.
How to do it:
- Brace your abdominals lightly.
- Reach your right arm forward and your left leg straight back until both are parallel to the floor.
- Hold for 3 to 5 seconds, return and switch.
Reps: 2 sets of 8 per side.
Common mistake: Lifting the leg too high, which arches the lower back and tips the pelvis forward. Imagine a cup of water resting on your lower back.
How Long Until You Notice a Change
Expect your hips to feel looser within the first one or two weeks. Visible change in how you stand takes longer, and for many people the main change is better control rather than a different resting shape.
Research on stretching alone is mixed. In a randomized trial with 82 healthy older adults, a 10-week program of twice-daily hip flexor stretching increased passive hip extension. People who started with limited hip extension during walking also took longer strides and extended the hip further.3 Stretching improved the hip’s range, but the authors did not see the same clear change in pelvic tilt across the whole group. This is one reason to pair stretches with strength work instead of relying on stretches alone.
A practical plan:
- Weeks 1 to 2: Stretches daily, pelvic tilt press daily, bridges every other day.
- Weeks 3 to 6: The full routine below, four to five times a week.
- After week 6: Keep the stretches daily if you sit a lot. Progress the strength exercises to the harder versions.
A 15-Minute Anterior Pelvic Tilt Routine
- Pelvic tilt press: 1 set of 12 to warm up
- Kneeling psoas stretch: 45 seconds per side
- Kneeling quad stretch: 30 seconds per side
- Glute bridge: 3 sets of 10
- Dead bug: 2 sets of 6 per side
- Bird dog: 2 sets of 8 per side
- Kneeling psoas stretch: 45 seconds per side, second round
- Child’s pose: 60 seconds
If you prefer to follow along, the Pelvic Tilt Reset routine runs through a similar sequence with a timer. For extra core work, add Posture Reset: Core Support on two days a week. If your hips stay stiff, the Hip Flexibility Builder routine gives more time to the front and back of the hip.
Daily Habits That Help
Exercises work better when the rest of your day supports them:
- Break up long sitting. Stand and do one kneeling psoas stretch or a few pelvic tilts every 45 to 60 minutes. Our article on tight hip flexors explains why sitting has such a strong effect on this area.
- Stand with soft knees. Locking the knees often pushes the pelvis forward. Keep a small bend and your weight over the middle of the feet.
- Check your ribs. Many people with a large tilt also stand with the lower ribs flared forward. Breathe out fully and let the ribs drop.
- Train the whole posture. The pelvis is one part of a chain. The exercises in our posture exercises guide cover the upper back and neck.
Who Should Be Careful
Most people can do these exercises safely. Take more care, or check with a professional first, if any of these apply:
- Pain that travels down the leg, numbness or tingling. This can come from an irritated nerve and needs assessment.
- Back pain after a fall or accident, or pain that wakes you at night.
- Pregnancy. The pelvis tilts forward naturally as the baby grows. Avoid lying flat on your back for long periods later in pregnancy and ask your midwife or physiotherapist which exercises suit you.
- A known spinal condition such as spondylolisthesis, or recent spinal surgery.
- Hip pain in the groin during the kneeling stretches. Pinching at the front of the hip is not a stretch sensation. Reduce the depth or skip the exercise.
See a physiotherapist or doctor if your back pain does not improve after four to six weeks of regular exercise, or if it gets worse. For general lower back care, our guide to stretching for lower back pain has more options.
Key Takeaways
- Some anterior tilt is normal: most healthy adults stand with a small forward tilt.
- Stretch the front, strengthen the back: hip flexor stretches open the range, and glute and abdominal work help you control it.
- Tuck before you stretch: a posterior pelvic tilt during kneeling stretches moves the stretch into the hip instead of the lower back.
- Give it six weeks: hip mobility changes first, posture control follows with regular practice.
Frequently Asked Questions
Can anterior pelvic tilt be fixed with exercise?
Exercise can improve how much you can move your pelvis and how well you control it. It will not change the shape of your bones, and some forward tilt is normal. Most people who combine hip flexor stretches with glute and abdominal strengthening for six weeks or more notice that they can stand in a more neutral position with less effort.
How often should I do anterior pelvic tilt exercises?
Do the stretches every day if you sit for long periods, because they take only a few minutes. Do the strengthening exercises four to five times a week. Your muscles need some recovery, but regular practice matters more than long sessions. A 15-minute routine done consistently works better than one long session each week.
Does anterior pelvic tilt cause lower back pain?
Not always. Many people with a clear forward tilt have no pain at all. For some people, a large tilt combined with weak abdominals and long hours of standing can make the lower back feel tired or tight. If your back pain is strong, constant or spreads into the leg, see a professional rather than assuming posture is the cause.
Should I stop doing squats or deadlifts if I have anterior pelvic tilt?
No. Squats and deadlifts strengthen the glutes and hamstrings, which help control the pelvis. Focus on keeping your ribs down and your lower back neutral during each repetition, and use a weight you can control. If you feel the effort mainly in your lower back, reduce the load and practice the glute bridge to learn how to use your glutes first.
References
Herrington L. (2011). Assessment of the degree of pelvic tilt within a normal asymptomatic population. Manual Therapy, 16(6), 646-648. PubMed ↩︎
González-de-la-Flor Á, Cotteret C, García-Pérez-de-Sevilla G, Domínguez-Balmaseda D, Del-Blanco-Muñiz JÁ. (2024). Comparison of two different stretching strategies to improve hip extension mobility in healthy and active adults: a crossover clinical trial. BMC Musculoskeletal Disorders, 25(1), 853. PubMed ↩︎
Watt JR, Jackson K, Franz JR, Dicharry J, Evans J, Kerrigan DC. (2011). Effect of a supervised hip flexor stretching program on gait in elderly individuals. PM&R, 3(4), 324-329. PubMed ↩︎
