If you’ve been dealing with a persistent ache deep in your buttock that sometimes shoots down the back of your leg, you’re not alone. Piriformis syndrome is one of the most under-recognized causes of buttock and leg pain, and it’s frequently mistaken for sciatica or lumbar disc problems. Many people spend months chasing the wrong diagnosis before anyone looks at the piriformis.
The piriformis is a small, flat muscle buried deep in the buttock, running from the front of the sacrum to the top of the femur. Its main job is external rotation of the hip. When this muscle becomes tight, inflamed, or goes into spasm, it can compress the sciatic nerve that runs directly beneath it (or in about 17% of people, right through it). The result is pain, tingling, or numbness that radiates from the buttock down the leg, mimicking the symptoms of a herniated disc.
The good news is that piriformis syndrome responds well to targeted stretching and exercise. Unlike structural spinal issues, this is a muscular problem with a muscular solution. This guide covers the anatomy, self-assessment, the most effective stretches, and a phased recovery approach backed by current research.
What Is Piriformis Syndrome?
The piriformis sits in the deepest layer of the buttock, beneath the gluteus maximus. It runs from the sacrum (the triangular bone at the base of your spine) to the greater trochanter at the top of your outer thigh. In a neutral hip position, the piriformis externally rotates the femur. Past 60 degrees of hip flexion, it switches roles and becomes an internal rotator and abductor.
The sciatic nerve, the thickest nerve in the body, exits the pelvis just below the piriformis. In a significant portion of the population, the nerve passes through the muscle itself, making those individuals especially vulnerable to compression when it tightens or swells.
Piriformis syndrome occurs when the piriformis irritates or compresses the sciatic nerve. This can happen from direct trauma (a fall on the buttock), overuse from running or cycling, prolonged sitting, or biomechanical imbalances like leg length discrepancy.
Piriformis Syndrome vs. Sciatica: A Quick Distinction
True sciatica originates from nerve compression at the spinal level, usually from a herniated disc or spinal stenosis. Piriformis syndrome produces similar symptoms but the compression happens at the buttock, not the spine. This distinction matters because piriformis syndrome rarely requires surgery and typically resolves with conservative care, while lumbar sciatica sometimes doesn’t.
One helpful clue: piriformis syndrome pain tends to worsen with prolonged sitting, climbing stairs, and hip rotation movements. It often produces tenderness when you press deep in the center of the buttock. Lumbar sciatica frequently worsens with forward bending and usually involves back pain alongside leg symptoms.
What Research Says About Stretching for Piriformis Syndrome
Stretching isn’t just a feel-good recommendation. There’s solid evidence supporting it as a primary treatment strategy for piriformis syndrome.
A study in the Journal of Orthopaedic & Sports Physical Therapy found that targeted piriformis stretching combined with hip strengthening reduced pain scores by an average of 72% over six weeks.1 Stretching alone produced significant relief, but the combination with strengthening yielded the best long-term outcomes.
Research in Archives of Physical Medicine and Rehabilitation demonstrated that sustained stretches held for 30 to 60 seconds were more effective than shorter holds for deep external rotators like the piriformis.2 The muscle’s response to lengthening requires a minimum threshold of time under stretch before tissue adaptation occurs.
A systematic review in Clinical Anatomy concluded that conservative management including stretching, physical therapy, and activity modification resolves symptoms in approximately 79% of cases.3 Surgery was only warranted in refractory cases that failed 6+ months of conservative care.
A study in the European Spine Journal found that patients with piriformis syndrome had significantly reduced internal rotation range of motion, averaging 15 degrees less than controls on the affected side.4 This supports the use of stretches targeting hip external rotation.
Research in Manual Therapy showed that myofascial release combined with stretching produced faster symptom relief than stretching alone, with 40% greater pain reduction at four weeks.5
How to Tell If You Have Piriformis Syndrome
These self-assessment tests are used by physical therapists and sports medicine practitioners. They can point you in the right direction, but they’re not a substitute for professional evaluation, especially if your symptoms are severe or worsening.
The FAIR Test (Flexion, Adduction, Internal Rotation)
Lie on your pain-free side with your affected leg on top. Bend the affected hip and knee to about 60 degrees each. Have a partner gently push your knee toward the floor (adducting and internally rotating the hip). If this reproduces your buttock pain or sends symptoms down your leg, it suggests piriformis involvement.
Solo version: lie on your back, bend the affected knee, and pull it across your body toward the opposite shoulder while keeping your pelvis flat.
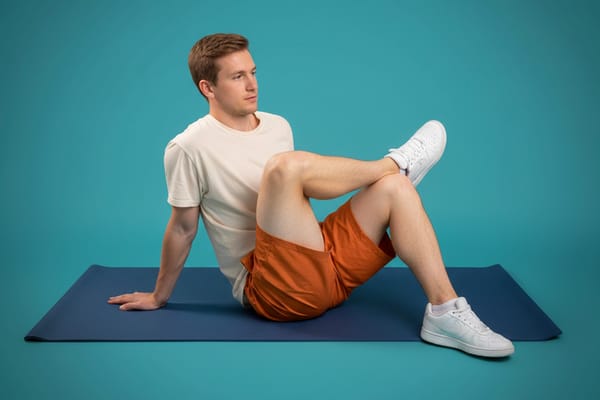
The Seated Piriformis Test
Sit on a firm chair with both feet flat. Cross your affected ankle onto the opposite knee. Gently lean forward while keeping your back straight. If this produces deep buttock pain on the crossed side, the piriformis is likely irritated.
The Active Piriformis Test
Lie on your back with both knees bent and feet flat. Externally rotate the affected hip (let the knee fall outward) against resistance from your hand. Pain deep in the buttock during this resisted motion suggests piriformis involvement.
If two or more tests reproduce your symptoms, piriformis syndrome is a strong possibility. If you also have significant back pain, saddle area numbness, or bowel/bladder changes, see a healthcare provider promptly.
The Most Effective Piriformis Stretches and Exercises
These stretches target the piriformis and surrounding external rotators from different angles. Start gently if you’re in an acute phase and gradually increase intensity. Hold each stretch for 30 to 60 seconds and repeat 2 to 3 times per side.
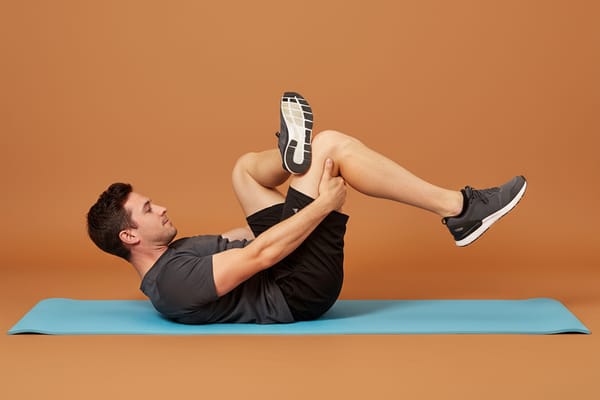
1. Supine Figure-Four Stretch
What it targets: Piriformis, deep external rotators, gluteus medius and minimus.
Why it works: The supine position lets you control stretch intensity precisely. Crossing the ankle over the opposite knee and pulling the bottom leg toward your chest creates external rotation and flexion at the hip, directly lengthening the piriformis.
How to do it:
- Lie on your back with both knees bent and feet flat on the floor
- Cross your affected ankle over the opposite knee
- Reach through the gap and clasp your hands behind the lower thigh
- Gently pull the bottom leg toward your chest until you feel a deep stretch in the buttock
- Keep your head and shoulders relaxed on the floor
- Hold for 30 to 60 seconds, breathing steadily
Key point: If you can’t reach behind the thigh, loop a towel around it. The stretch should feel deep but not painful. Ease off if you feel sharp pain or nerve symptoms.
You’ll find this stretch in our Deep Hip Release Session and Hip Flexibility Foundation routines.
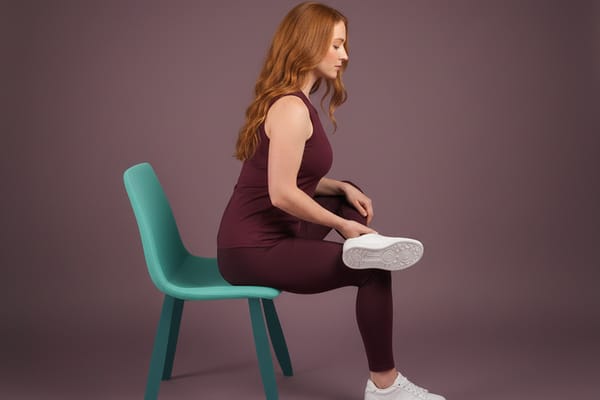
2. Seated Figure-Four Stretch
What it targets: Piriformis, gemelli, obturator internus, gluteus maximus.
Why it works: Sitting upright adds gravity assistance and lets you use trunk weight to deepen the stretch. The forward lean increases hip flexion, intensifying the piriformis stretch.
How to do it:
- Sit on a chair or bench with both feet on the floor
- Cross the affected ankle over the opposite knee
- Sit tall and slowly lean forward, hinging at the hips
- Gently press the crossed knee downward with your hand for added stretch
- Hold for 30 to 60 seconds
Variation: An excellent option for office workers. You can do it right at your desk throughout the day.
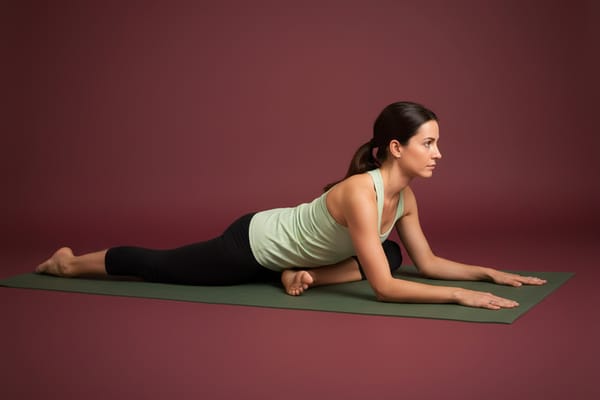
3. Pigeon Pose
What it targets: Piriformis, deep external rotators, hip flexors of the back leg, gluteus maximus.
Why it works: One of the most intense piriformis stretches available. The front leg is in external rotation and flexion, creating a strong stretch through the entire deep rotator group. Gravity gradually deepens the stretch over time.
How to do it:
- Start on all fours, then bring your right knee forward behind your right wrist
- Slide your left leg back until it’s straight behind you
- Your right shin can be angled (it doesn’t need to be parallel to the mat)
- Lower your hips toward the floor, keeping them square
- Walk your hands forward and lower your torso for a deeper stretch
- Hold for 30 to 60 seconds, then switch sides
Key point: If pigeon is too intense, start with the supine figure-four and work up to this over a few weeks. If you feel knee pain in the front leg, reduce the angle of the shin.
Pigeon pose appears in our Deep Hip Release Session and Hip Flexibility Builder routines.
4. Double Pigeon (Fire Log Pose)
What it targets: Piriformis, deep external rotators, outer hip, gluteus medius.
Why it works: Stacking both shins creates external rotation in both hips simultaneously, targeting the piriformis from a unique angle compared to single-leg stretches.
How to do it:
- Sit with your right shin parallel to the front edge of the mat
- Stack your left ankle on your right knee and left knee on your right ankle
- Sit tall, then slowly fold forward to deepen the stretch
- Hold for 30 to 60 seconds, then switch which leg is on the bottom
Variation: If stacking the shins is too intense, place a block or towel between your top knee and bottom ankle.

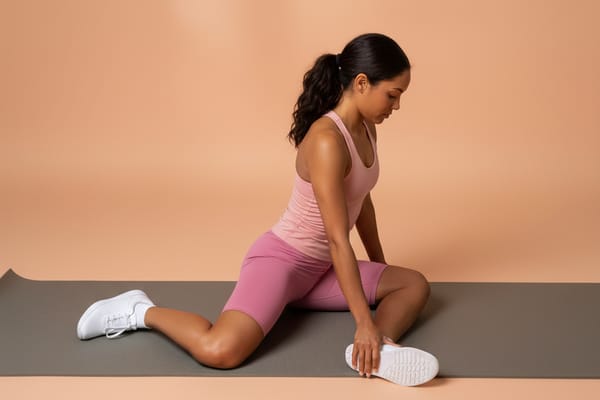
5. 90-90 Stretch
What it targets: Piriformis, external rotators on the front leg, internal rotators on the back leg, hip capsule.
Why it works: Stretches external rotation on one side and internal rotation on the other simultaneously. Working both rotation patterns helps restore balanced hip function.
How to do it:
- Sit with your right leg in front, knee and hip both at 90-degree angles
- Your left leg is to the side, also at 90-degree angles with the knee pointing left
- Sit tall and gently lean your torso over the front leg
- You should feel a deep stretch in the outer hip of the front leg
- Hold for 30 to 60 seconds, then switch sides
Key point: Keep both sit bones on the floor. If one hip lifts, sit on a cushion to reduce the angle.
You can practice the 90-90 in our Hip Flexibility Builder and Hip Immersion Lab routines.
6. Leaning Figure-Four Stretch
What it targets: Piriformis, gluteus maximus, deep external rotators with an added lateral hip stretch.
Why it works: This variation uses gravity and a squat position to reach fibers of the piriformis that a straight-on stretch might miss. Particularly effective for people who find the supine version too mild.
How to do it:
- Stand near a wall or sturdy surface for balance
- Cross your affected ankle over the opposite knee
- Slowly lower into a partial squat, as if sitting back into an invisible chair
- Gently press the crossed knee away from your body
- Hold for 30 to 60 seconds
Key point: Squat depth determines stretch intensity. Start shallow and go deeper as your tolerance improves.
7. Lizard Pose
What it targets: Hip flexors, piriformis, adductors, deep external rotators.
Why it works: A deep lunge that opens the hip differently than figure-four variations. Letting the front knee fall outward adds external rotation that engages the piriformis, while the back hip gets a flexor stretch that addresses tight flexors contributing to piriformis overload.
How to do it:
- From a low lunge, place both hands inside the front foot
- Lower your elbows to a block or the floor if possible
- Let the front knee drift outward for added external rotation
- Keep the back leg straight and strong
- Hold for 30 to 60 seconds per side
Variation: For a gentler version, keep your hands on blocks rather than lowering to elbows.

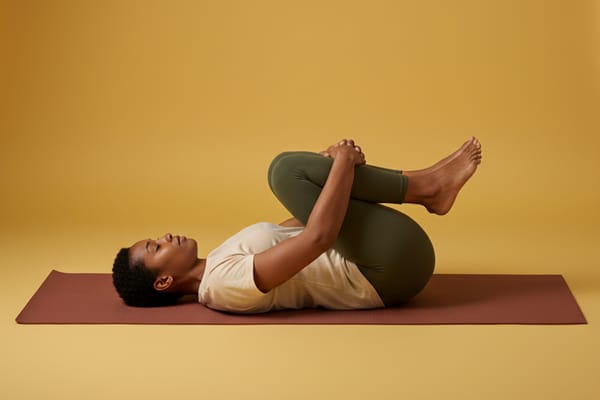
8. Knees-to-Chest Stretch
What it targets: Lower back, gluteus maximus, mild piriformis stretch, lumbar decompression.
Why it works: Provides gentle traction to the lumbar spine and buttock area without aggressive piriformis loading. Safe even during the acute phase when more intense stretches might aggravate symptoms.
How to do it:
- Lie on your back and bring both knees toward your chest
- Clasp your hands around your shins or behind your thighs
- Gently pull your knees closer, rocking slightly side to side
- Hold for 30 to 60 seconds
Key point: A great starting stretch for acute piriformis flare-ups when more intense positions are too painful.
9. Butterfly Stretch
What it targets: Adductors, piriformis, inner hip, pelvic floor muscles.
Why it works: Places the hips in external rotation and abduction, gently stretching the piriformis along with the inner thigh. Less intense than pigeon or double pigeon, making it suitable for all recovery phases. Tight adductors can contribute to piriformis compensation, so addressing them supports complete recovery.
How to do it:
- Sit and bring the soles of your feet together, letting your knees fall open
- Hold your feet or ankles with your hands
- Sit tall and gently press your knees toward the floor with your elbows
- For a deeper stretch, slowly fold forward from the hips
- Hold for 30 to 60 seconds
Variation: Sit on a folded blanket or cushion to tilt the pelvis forward if sitting upright is difficult.
You’ll find the butterfly in our Hip Flexibility Foundation routine.

10. Glute Bridge with Hold
What it targets: Gluteus maximus, hamstrings, core. This is a strengthening exercise, not a stretch.
Why it works: A weak gluteus maximus forces the piriformis to take on extra stabilization duties, leading to overuse. Bridges strengthen the glutes and teach proper activation patterns, reducing piriformis load over time.
How to do it:
- Lie on your back with knees bent and feet hip-width apart
- Press through your heels to lift your hips until your body forms a straight line from shoulders to knees
- Squeeze your glutes hard at the top and hold for 5 seconds
- Lower slowly and repeat 10 to 15 times
- Perform 2 to 3 sets
Key point: Focus on feeling the contraction in your glutes, not your hamstrings or lower back. If your hamstrings cramp, bring your feet closer to your body.
Common Mistakes That Slow Recovery
Mistake 1: Stretching Too Aggressively During Acute Flare-Ups
When pain is at its worst, the natural instinct is to stretch hard and often. But an inflamed piriformis can react to aggressive stretching with more spasm and irritation, creating a cycle that sets you back.
Fix: Stick to gentle stretches like knees-to-chest and mild figure-four holds. Keep intensity at a 3 to 4 out of 10. Save deeper positions like pigeon and double pigeon for when acute pain has settled.
Mistake 2: Only Stretching Without Strengthening
Stretching provides relief, but it doesn’t solve the underlying problem if weakness is driving the piriformis to overwork. Many people stretch daily for weeks and wonder why symptoms keep returning.
Fix: Once past the acute phase, incorporate glute strengthening: bridges, clamshells, and lateral band walks. Building gluteus maximus and medius strength takes the stabilization burden off the piriformis.
Mistake 3: Sitting on Hard Surfaces for Extended Periods
Prolonged sitting compresses the piriformis between the chair and the sciatic nerve. If you sit on a hard chair for 8 hours a day, stretching alone may not overcome that daily compression.
Fix: Use a cushion (ideally with a cutout for the sit bones), stand regularly, and take walking breaks every 30 to 45 minutes.
Mistake 4: Ignoring Cross-Body Compensation Patterns
Piriformis syndrome frequently involves the entire kinetic chain. Tight hip flexors, weak core muscles, and stiff thoracic spine can all contribute to excessive piriformis loading.
Fix: Include hip flexor stretches, core stabilization, and general hip mobility in your recovery. Our Hip Flexibility Foundation routine addresses several of these contributing factors.
Mistake 5: Returning to High-Impact Activity Too Quickly
Running, cycling, and heavy squatting place significant demands on the piriformis. Returning too early is one of the most common causes of recurrence.
Fix: Follow a phased return. Start with walking, progress to easy cycling, and add running or heavy lower body training only when all piriformis stretches are pain-free and glute strength is adequate.
Building a Piriformis Recovery Practice
Recovery from piriformis syndrome moves through distinct phases. Rushing ahead is counterproductive, but staying in the gentle phase too long leaves potential recovery on the table.
Acute Phase (First 1-2 Weeks)
The goal during this phase is to reduce inflammation and pain without further irritating the piriformis.
Stretching: Gentle knees-to-chest, mild supine figure-four (hold for 20 to 30 seconds, stay at low intensity), and butterfly stretch. Perform these 2 to 3 times daily.
Activity: Walk gently for 10 to 15 minutes several times daily. Avoid sitting for more than 20 to 30 minutes at a time. Skip running, stair climbing, and heavy lower body exercise.
Supplementary: Ice the affected area for 15 minutes after stretching sessions. Sleeping with a pillow between your knees can reduce overnight piriformis strain.
Progressive Phase (Weeks 2-6)
Once acute pain has settled (you can sit for 30+ minutes without significant discomfort), gradually increase stretch intensity and begin basic strengthening.
Stretching: Add seated figure-four, pigeon pose (gently at first), and 90-90 stretch. Increase hold times to 30 to 60 seconds. Stretch once or twice daily. Try our Deep Hip Release Session for a guided approach.
Strengthening: Begin with glute bridges (2 sets of 10), clamshells, and side-lying leg lifts. These exercises activate the gluteus maximus and medius without stressing the piriformis.
Activity: Walking distance can increase. Easy cycling on flat terrain is usually well tolerated. Continue avoiding high-impact activities.
Strengthening Phase (Weeks 6+)
At this point, stretches should be comfortable and daily activities pain-free. Now you build the resilience that prevents recurrence.
Stretching: Full range of piriformis and hip stretches, including double pigeon, deeper pigeon, and the Hip Flexibility Builder routine. Maintain daily or every-other-day practice.
Strengthening: Single-leg bridges, Romanian deadlifts, lateral band walks with resistance, and eventually squats and lunges.
Activity: Gradual return to sport-specific activities. For runners, start with walk-run intervals and build volume by no more than 10% per week. Monitor for any return of symptoms.
Piriformis Syndrome vs. Sciatica: Key Differences
Distinguishing between these two conditions is one of the most common diagnostic challenges. Here are the key characteristics:
Piriformis syndrome typically presents with:
- Deep buttock pain as the primary symptom
- Pain that worsens with prolonged sitting, particularly on hard surfaces
- Tenderness when pressing on the piriformis (center of the buttock)
- Pain during hip rotation movements, stair climbing, or getting out of a car
- Symptoms that improve with walking and gentle stretching
- Rarely involves significant back pain
- Positive FAIR test and seated piriformis test
Lumbar sciatica typically presents with:
- Low back pain that radiates into the leg
- Pain that worsens with forward bending, coughing, or sneezing
- Numbness or weakness in specific dermatomal patterns (L4, L5, S1)
- Pain that may improve with extension (arching the back)
- Positive straight leg raise test
- Findings on MRI such as disc herniation or foraminal stenosis
Both conditions can coexist. A person with a mild disc bulge may also have piriformis tension that exacerbates their symptoms. If home management isn’t producing results within 4 to 6 weeks, a thorough evaluation by a qualified practitioner is the next step.
For more on managing sciatica specifically, see our Sciatica Stretches and Exercises: The Complete Relief Guide.
When to See a Professional
Piriformis syndrome usually responds well to self-management, but certain situations warrant professional evaluation:
- Symptoms lasting more than 6 weeks despite consistent stretching and activity modification
- Progressive weakness in the foot or leg (difficulty lifting the foot, tripping when walking)
- Numbness that doesn’t resolve or is spreading to new areas
- Bowel or bladder changes (this is urgent and requires immediate medical attention)
- Pain that wakes you from sleep regularly or prevents you from finding any comfortable position
- Recent significant trauma such as a fall or car accident preceding the onset of symptoms
- Bilateral symptoms (both sides affected) which may indicate a spinal rather than muscular issue
A physical therapist, sports medicine physician, or orthopedic specialist can perform a thorough examination and develop a targeted plan. Treatments like dry needling, manual therapy, and guided exercise programs can accelerate recovery beyond self-management alone.
Frequently Asked Questions
How long does piriformis syndrome take to heal?
Most people see significant improvement within 4 to 6 weeks of consistent stretching and strengthening. Complete resolution typically takes 2 to 3 months. Chronic cases (present for months or years) may take longer. The key factor is consistency.
Can I keep running with piriformis syndrome?
It depends on severity. If running causes sharp pain or radiating symptoms, stop and let the acute phase settle. Mild cases may tolerate easy, short runs. As a general rule, if running makes symptoms worse for the rest of the day or the next morning, you’re doing too much. Walk instead and reintroduce running during the strengthening phase.
Is it better to use heat or ice for piriformis syndrome?
During the acute phase (first 1 to 2 weeks), ice helps reduce inflammation. Apply for 15 minutes after stretching or when pain is elevated. In the progressive phase, heat before stretching increases tissue extensibility. A warm bath or heating pad for 10 to 15 minutes before your session can make stretches more effective.
How often should I stretch the piriformis?
During the acute phase, gentle stretches 2 to 3 times daily work well. In the progressive phase, once or twice daily is sufficient. For maintenance, 3 to 5 times per week prevents recurrence. Duration matters more than frequency: holding stretches for 30 to 60 seconds produces better results than quick 10-second holds.
Can piriformis syndrome be caused by sitting?
Absolutely. Prolonged sitting is one of the most common triggers. The piriformis gets compressed between the chair and the sciatic nerve, leading to irritation, tightness, and potential spasm over time. People who sit 8+ hours per day are especially vulnerable, particularly if they cross their legs frequently or sit on hard surfaces.
Does piriformis syndrome show up on MRI?
Standard MRI typically does not show piriformis syndrome directly because it’s a soft tissue and functional problem. However, MRI is useful for ruling out other causes like disc herniation or tumors. Specialized MRI neurography can sometimes visualize piriformis swelling, but it’s not commonly ordered. Piriformis syndrome is primarily a clinical diagnosis based on history and physical examination.
Related Articles
- Sciatica Stretches and Exercises: The Complete Relief Guide
- The Complete Hip Flexibility Guide
- Lower Back Pain and Stretching: The Complete Guide
References
Tonley, J.C., Yun, S.M., et al. “Treatment of an individual with piriformis syndrome focusing on hip muscle strengthening and movement re-education.” Journal of Orthopaedic & Sports Physical Therapy, 2010; 40(2): 103-111. ↩︎
Bandy, W.D., Irion, J.M., & Briggler, M. “The effect of time and frequency of static stretching on flexibility of the hamstring muscles.” Archives of Physical Medicine and Rehabilitation, 1997; 78(10): 1060-1064. ↩︎
Hopayian, K., & Danielyan, A. “Piriformis syndrome: a systematic search and review.” Clinical Anatomy, 2018; 31(7): 969-977. ↩︎
Carro, L.P., Hernando, M.F., et al. “Deep gluteal space problems: piriformis syndrome, ischiofemoral impingement and sciatic nerve release.” European Spine Journal, 2016; 25(Suppl 1): 64-71. ↩︎
Fishman, L.M., Dombi, G.W., et al. “Piriformis syndrome: diagnosis, treatment, and outcome.” Archives of Physical Medicine and Rehabilitation, 2002; 83(3): 295-301. ↩︎