About This Front Split Routine
Achieving a front split takes time, patience, and the right foundation. Research shows that consistent stretching programs can produce meaningful improvements in range of motion over time.1 Many people jump straight into aggressive stretching only to hit a plateau or worse, strain a muscle. This beginner routine focuses on the muscle groups that matter most for front split progress: your hip flexors, quadriceps, and hamstrings.
What This Routine Targets
The front split requires flexibility in opposing directions. Your front leg needs open hamstrings while your back leg demands loose hip flexors and quads. This routine addresses both sides of that equation through lunges, hip openers, and seated stretches that prepare your body for deeper work down the road.
What’s Included
You’ll spend about six minutes working through six fundamental stretches. The sequence progresses from standing lunges that warm up your hip flexors to seated positions that target your hamstrings. Each exercise builds on the previous one to gradually increase your range of motion.
Who Should Try This
This routine is designed for beginners who want to work toward a front split safely. It’s also useful for anyone who has taken a break from flexibility training and wants to rebuild their foundation before attempting more advanced positions.
Tips for Best Results
Warm up before this routine with a few minutes of walking or light movement. Cold muscles don’t stretch as effectively and are more prone to injury. Focus on keeping your hips square during lunges and avoid bouncing in any position.

Lunge
Duration: 1:00
Sink into a kneeling lunge to stretch your hip flexors and lengthen the front of your body.
Difficulty: Beginner
Instructions
- Start kneeling and step one foot forward, planting it flat in front of you.
- Press your hips forward as you raise both arms overhead.
- Lift through your chest and reach toward the ceiling while breathing deeply.
Tips
- Keep the front knee stacked over the ankle for stability.
- Press the top of your back foot into the floor to engage the rear leg.
- Stay tall through your torso to avoid dumping into the lower back.
Adjustments
- Rest your hands on your front thigh if reaching overhead feels intense.
- Place a towel or cushion under your back knee for comfort.
- Hold onto a wall or chair for balance when needed.

Reverse Lunge
Duration: 1:00
From a kneeling stance, extend one leg forward to stretch the backside while keeping your balance dialed in.
Difficulty: Beginner
Instructions
- Begin kneeling with knees hip-width apart and tops of your feet on the floor.
- Extend one leg forward, pressing the heel into the ground and keeping the leg straight.
- Hinge at your hips to lower the torso toward the floor, placing hands down for balance.
- Hold the stretch briefly, then switch legs.
Tips
- Keep your chest lifted and back long even as you hinge forward.
Adjustments
- Place a folded blanket under your kneeling knee for comfort.

Lizard Pose
Duration: 1:00
Slide into lizard pose to deeply stretch your hips, groin, and hamstrings.
Difficulty: Intermediate
Instructions
- Start in tabletop, then step one foot outside the same-side hand.
- Lower your hips toward the floor and extend the back leg straight behind you, knee and top of the foot resting on the mat.
- Keep your chest lifted as you breathe into the stretch.
Tips
- Let your hips relax and sink toward the floor.
- Lift the back knee and come onto forearms for more intensity when you are ready.
Adjustments
- Use yoga blocks under your hands if the floor feels far away.

Seated Fold
Duration: 0:30
Reach forward from a tall seat to stretch your hamstrings and back with a calming fold.
Difficulty: Beginner
Instructions
- Sit with legs extended and reach your arms overhead to lengthen your spine.
- Hinge at the hips and fold forward, reaching for your toes, shins, or ankles.
- Hold the stretch while breathing slowly, keeping your spine long.
Tips
- Focus on hinging from the hips instead of rounding your back.
Adjustments
- Use a strap around your feet or keep hands on your shins if your toes feel far away.
- Keep a slight bend in the knees if your hamstrings are tight.
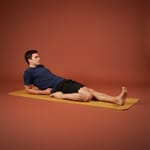
Quad Stretch
Duration: 1:00
Stretch your quads by tucking one foot beside you and leaning back into a deep, satisfying release.
Difficulty: Beginner
Instructions
- Sit with legs extended, then bend one knee and draw the heel back toward your glute.
- Hold the ankle and tuck the foot directly under your hip.
- Lean back onto your elbows or as far as comfortable while breathing into the stretch.
Tips
- Keep your hips, knees, and ankles in one line.
- Make sure the foot stays tucked under your glute rather than flaring out to the side.
Adjustments
- Loop a strap around your foot if reaching the ankle feels tough.
- Lie on your side and pull the foot toward you for a softer variation if your knees are sensitive.

Hurdler
Duration: 1:00
Set up like a hurdler and fold forward to stretch your hamstrings, calves, and hips with precision.
Difficulty: Beginner
Instructions
- Sit tall with legs extended, then bend one leg and place the sole against the inner thigh of the other leg.
- Reach through the spine and hinge forward from the hips toward the extended foot.
- Hold the foot, ankle, or shin while breathing into the stretch, then switch sides.
Tips
- Lead with your chest rather than rounding your back.
- Keep the extended leg engaged and the foot flexed without locking the knee.
Adjustments
- Use a strap or towel around your foot if your hands do not reach comfortably.
- Soften the knee of the extended leg if you need less intensity.
Building Your Front Split Over Time
Stand up gently, shake out your legs, and note where you felt the most progress. The front split is a long-term goal that develops over weeks and months of consistent practice.
Try this routine three to four times per week. As these positions become comfortable, you can progress to intermediate front split routines that include longer holds and deeper variations.


