About This Lower Back Stretching Routine
Lower back pain affects millions of people, and much of it stems from tight muscles rather than structural problems. Research shows that targeted stretching and mobility exercises can be effective in reducing pain and improving function in those with chronic low back pain.1 Hours spent sitting at a desk, driving, or standing in one position can cause the muscles surrounding your lumbar spine to become tense and shortened. This gentle routine targets the areas that contribute most to lower back discomfort.
Why Your Lower Back Gets Tight
The connection between your lower back and other body parts is often underestimated. Tight hip flexors can tilt your pelvis forward and increase the curve in your lower spine. Stiff hamstrings can pull your pelvis backward and flatten that curve unnaturally. Either imbalance creates stress where your body doesn’t need it. By addressing all these connected areas, this routine helps restore balance and reduce strain on your lower back.
What’s Included
You’ll spend about thirteen minutes moving through eleven different stretches. The sequence starts with the rag doll position to decompress your spine and finishes with legs up the wall for a calming reset. In between, you’ll work through lunges for your hip flexors, child’s pose for gentle spinal flexion, and several floor-based stretches that release tension in your glutes and hamstrings.
Who Should Try This
This routine is ideal for anyone dealing with general lower back tightness from sitting, mild discomfort after long days, or stiffness that builds up over the workweek. It’s gentle enough for beginners but thorough enough to benefit experienced stretchers too.
Tips for Best Results
Move slowly and breathe deeply into each position. Rushing through stretches won’t give your nervous system time to relax and allow the muscles to lengthen. If you feel sharp pain during any movement, stop immediately and choose a gentler variation.
Consistency matters more than duration when managing lower back tension. Doing this flow three to four times per week will likely produce better results than one long session once a week. Keep a yoga mat or thick blanket handy for comfort during floor exercises.
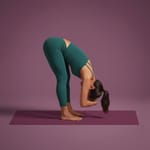
Rag Doll
Duration: 1:00
Fold like a rag doll to let your spine decompress and your hamstrings stretch gently.
Difficulty: Beginner
Instructions
- Stand with feet hip-width apart and knees softly bent.
- Inhale to reach arms overhead and lengthen your spine.
- Exhale to hinge at the hips, letting your torso drape forward.
- Grab opposite elbows and allow head and arms to hang heavy.
Tips
- Distribute weight evenly between heels and balls of the feet.
- Focus on lengthening your spine instead of trying to touch the floor.
Adjustments
- Bend your knees more deeply if your back feels tight.
- Rest elbows on a block or chair for extra support.
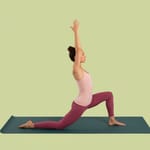
Lunge
Duration: 2:00
Sink into a kneeling lunge to stretch your hip flexors and lengthen the front of your body.
Difficulty: Beginner
Instructions
- Start kneeling and step one foot forward, planting it flat in front of you.
- Press your hips forward as you raise both arms overhead.
- Lift through your chest and reach toward the ceiling while breathing deeply.
Tips
- Keep the front knee stacked over the ankle for stability.
- Press the top of your back foot into the floor to engage the rear leg.
- Stay tall through your torso to avoid dumping into the lower back.
Adjustments
- Rest your hands on your front thigh if reaching overhead feels intense.
- Place a towel or cushion under your back knee for comfort.
- Hold onto a wall or chair for balance when needed.
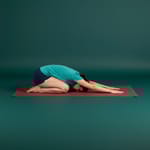
Child's Pose
Duration: 1:00
Melt into child's pose to reset your breath and relax the back with a calming stretch.
Difficulty: Beginner
Instructions
- Start on hands and knees, then widen your knees while keeping big toes touching.
- Sit your hips back toward your heels and reach your hands forward.
- Lower your chest between your thighs and rest your forehead on the floor or a support.
Tips
- Crawl your fingertips forward to deepen the stretch through the sides of your body.
- Let your chest sink toward the ground with each exhale.
Adjustments
- Keep knees closer together if that feels better for your hips.
- Rest your forehead on a block, pillow, or folded blanket if it does not reach the floor.
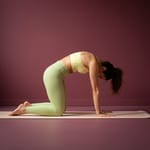
Cat Cow
Duration: 1:00
Flow through cat and cow to mobilize your spine and melt away stiffness one breath at a time.
Difficulty: Beginner
Instructions
- Begin on hands and knees with wrists under shoulders and knees under hips.
- Inhale as you drop your belly, lift your chest, and gaze forward or slightly up.
- Exhale as you round your spine, draw the belly toward the ceiling, and tuck your chin.
- Continue gliding between the two shapes in rhythm with your breath.
Tips
- Move slowly enough that each vertebra gets a moment of attention.
Adjustments
- Keep your head more neutral if your neck prefers less movement.
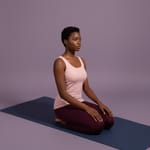
Thunderbolt
Duration: 1:00
Sit back on your heels in thunderbolt to stretch your shins and ankles while encouraging calm posture.
Difficulty: Beginner
Instructions
- Kneel with knees together and tops of your feet on the floor.
- Sit back on your heels with big toes touching and heels slightly apart.
- Rest hands on thighs, palms down, and sit tall with shoulders relaxed.
Tips
- Engage your core to support the lower back.
Adjustments
- Place a cushion between your heels and hips if sitting back feels intense.
- Slide a folded blanket under your knees for extra comfort.
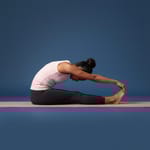
Seated Fold
Duration: 1:00
Reach forward from a tall seat to stretch your hamstrings and back with a calming fold.
Difficulty: Beginner
Instructions
- Sit with legs extended and reach your arms overhead to lengthen your spine.
- Hinge at the hips and fold forward, reaching for your toes, shins, or ankles.
- Hold the stretch while breathing slowly, keeping your spine long.
Tips
- Focus on hinging from the hips instead of rounding your back.
Adjustments
- Use a strap around your feet or keep hands on your shins if your toes feel far away.
- Keep a slight bend in the knees if your hamstrings are tight.
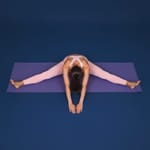
Seated Straddle
Duration: 1:00
Slide into a wide-legged seat and fold forward to stretch your inner thighs and hamstrings with intention.
Difficulty: Intermediate
Instructions
- Sit with legs extended, then open them wide into a straddle.
- Place your hands on the floor in front of you and lengthen your spine.
- Hinge at the hips to reach forward, lowering your torso toward the floor while breathing steadily.
Tips
- Keep your back long and avoid rounding as you fold.
- Flex your feet and point toes upward to keep legs active.
Adjustments
- Rest hands on blocks or a chair if reaching forward feels challenging.
- Sit on a folded blanket to elevate your hips and create more comfort.
Knees-to-Chest
Duration: 1:00
Hug your knees to your chest to release the lower back and gently stretch the hips.
Difficulty: Beginner
Instructions
- Lie on your back with legs extended and arms by your sides.
- Bend both knees and draw them toward your chest.
- Wrap your arms around your shins and hug the knees in, breathing deeply.
Tips
- Let your head and neck relax on the floor.
- Keep your lower back gently pressing into the mat.
Adjustments
- Hold behind your thighs instead of the shins if that feels better for your body.
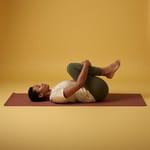
Lying Figure Four
Duration: 2:00
Ease into a lying figure four to release tight glutes and soothe your lower back.
Difficulty: Beginner
Instructions
- Lie on your back with knees bent and feet flat on the floor.
- Cross one ankle over the opposite thigh just above the knee.
- Lift the bottom leg and clasp hands behind the thigh, gently pulling the legs toward your chest.
Tips
- Relax your head and shoulders on the floor.
- Keep your lower back pressing gently into the mat.
Adjustments
- Loop a strap behind your thigh if reach is an issue.
- Leave the bottom foot on the floor for a lighter stretch.
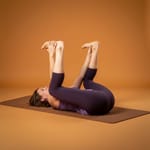
Happy Baby
Duration: 1:00
Rock into happy baby to soothe your lower back and open your hips with a playful stretch.
Difficulty: Beginner
Instructions
- Lie on your back with knees bent and feet flat.
- Lift your feet and draw knees toward your armpits.
- Grab the outer edges of your feet and gently pull your knees toward the floor while keeping your low back grounded.
Tips
- Press your tailbone toward the floor to keep the lower back happy.
- Relax your shoulders and jaw while you breathe.
Adjustments
- Hold your ankles or calves if reaching your feet is a stretch today.

Legs-up-Wall
Duration: 1:00
Kick your legs up the wall to refresh tired legs and calm your nervous system.
Difficulty: Beginner
Instructions
- Sit with one hip next to a wall, then lie back and swing your legs up in one smooth motion.
- Scoot your hips as close to the wall as is comfortable and extend your legs straight up.
- Rest your arms by your sides with palms up and breathe deeply.
Tips
- Keep your legs relaxed and knees soft.
Adjustments
- Move your hips a little farther from the wall if your hamstrings feel tight.
- Place a cushion or folded blanket under your hips for extra support.
When you’re ready to get up, roll gently onto your side and use your hands to press yourself to a seated position. Avoid jerking up quickly since your spine has just been through a relaxing sequence and needs a gradual transition back to normal activity.
Maintaining a Healthy Lower Back
Take a moment to notice how your lower back feels now. Many people experience an immediate sense of relief or lightness after this routine. The more consistently you practice, the longer that relief tends to last between sessions.
For ongoing lower back care, aim to do this routine at least three times per week. If your lower back tightness is related to sitting, small habit changes like walking around every hour or adjusting your chair height can amplify your results.


