About This Advanced Pelvic Floor Routine
A responsive pelvic floor requires dynamic movement, not just isolated exercises. This advanced flow integrates pelvic floor support into full-body movement patterns, building the kind of functional resilience that serves you throughout daily life and athletic activities.
What This Routine Targets
This flow addresses pelvic floor health through comprehensive hip mobility. You’ll mobilize through hip circles and dynamic warm-ups, stretch through deep lunges and hip openers, release through floor-based positions like frog and lizard, and integrate gentle activation through bridges and pelvic tilts.
What’s Included
This fifteen-minute routine includes twenty-four exercises that flow together dynamically. The comprehensive approach ensures all the muscles affecting pelvic floor function receive attention. The sequence moves from standing dynamic work through deep floor stretches to restorative finishing positions.
Who Should Try This
This routine serves advanced practitioners wanting to integrate pelvic floor work into flowing movement. It benefits athletes, yoga practitioners, and anyone who has built a foundation of pelvic floor awareness and wants to develop it through dynamic practice.
Tips for Best Results
Stay connected to your breath throughout the flow. The pelvic floor moves with your breathing, so maintaining breath awareness enhances the work. Let the dynamic portions build heat while the restorative portions allow release.

Hip Circles
Duration: 0:30
Draw smooth circles with your hips to mobilize the pelvis and lower back before deeper work.
Difficulty: Beginner
Instructions
- Stand with feet hip-width apart and hands resting on your hips.
- Slowly rotate your hips in a circular motion, tracing a wide circle in one direction.
- After several reps, switch directions to balance the movement.
Tips
- Keep your core engaged to support the lower back.
- Maintain soft knees rather than locking them out.
Adjustments
- Shrink the circle if your range of motion feels limited today.
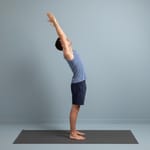
Upward Salute
Duration: 0:30
Sweep your arms skyward in upward salute to lengthen your spine and awaken your upper body.
Difficulty: Beginner
Instructions
- Stand with feet hip-width apart and arms at your sides.
- Sweep your arms out and up overhead, keeping hands shoulder-width apart.
- Reach toward the ceiling while relaxing your shoulders and gazing slightly upward.
Tips
- Ground evenly through both feet.
- Engage your core to avoid arching your lower back.
Adjustments
- Place your hands behind your head or on your hips if raising them overhead feels intense.
Toe Touch
Duration: 0:30
Fold forward from standing to stretch your hamstrings and lower back with a calming release.
Difficulty: Beginner
Instructions
- Stand with feet hip-width apart and arms relaxed by your sides.
- Hinge at your hips to fold forward, lowering your torso toward your legs.
- Relax your head, neck, and arms, aiming to place your palms on the floor.
Tips
- Lengthen through your spine as you fold.
- Keep legs straight but avoid locking your knees.
Adjustments
- Rest your hands on shins or thighs if the floor feels out of reach.
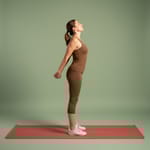
Reverse Shoulder
Duration: 0:30
Interlace your hands behind you to stretch the front of your shoulders and chest.
Difficulty: Beginner
Instructions
- Stand with feet hip-width apart and clasp your hands behind your back, thumbs pointing down.
- Straighten your arms and gently lift your hands away from your back.
- Draw shoulders back and down, lift your chest, and tuck your chin slightly while holding the stretch.
Tips
- Engage your core so your lower back stays supported.
- Avoid overarching through your spine as you lift your hands.
Adjustments
- Lift your hands only a little if the stretch feels intense today.
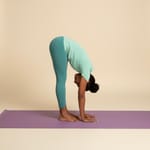
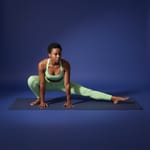
Wide Leg Bend
Duration: 0:30
Fold forward with legs wide to stretch your hamstrings, hips, and lower back.
Difficulty: Beginner
Instructions
- Stand with feet wide and toes pointing forward.
- Hinge at your hips to fold forward, lowering your torso toward your legs.
- Relax your head, neck, and arms, aiming to place your palms on the floor.
Tips
- Lengthen through your spine as you fold.
- Keep legs straight but avoid locking your knees.
- Hold ankles and draw your head closer if you want more stretch.
Adjustments
- Rest hands on shins or blocks if the floor feels far away.
Side Lunge
Duration: 1:00
Sink into a side lunge to stretch your groin and hamstrings while building strength.
Difficulty: Beginner
Instructions
- Stand with feet wide apart.
- Shift your weight to one side, bending that knee and keeping the opposite leg straight.
- Place hands on the floor for balance and lower your hips until you feel a stretch in the inner thigh, rotating the straight-leg foot so the heel grounds and toes point up.
Tips
- Lift your chest and keep your back long.
Adjustments
- Stay higher if the stretch feels intense.
- Hold a chair or wall for extra balance support.
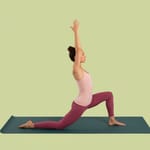
Lunge
Duration: 1:00
Sink into a kneeling lunge to stretch your hip flexors and lengthen the front of your body.
Difficulty: Beginner
Instructions
- Start kneeling and step one foot forward, planting it flat in front of you.
- Press your hips forward as you raise both arms overhead.
- Lift through your chest and reach toward the ceiling while breathing deeply.
Tips
- Keep the front knee stacked over the ankle for stability.
- Press the top of your back foot into the floor to engage the rear leg.
- Stay tall through your torso to avoid dumping into the lower back.
Adjustments
- Rest your hands on your front thigh if reaching overhead feels intense.
- Place a towel or cushion under your back knee for comfort.
- Hold onto a wall or chair for balance when needed.
Reverse Lunge
Duration: 1:00
From a kneeling stance, extend one leg forward to stretch the backside while keeping your balance dialed in.
Difficulty: Beginner
Instructions
- Begin kneeling with knees hip-width apart and tops of your feet on the floor.
- Extend one leg forward, pressing the heel into the ground and keeping the leg straight.
- Hinge at your hips to lower the torso toward the floor, placing hands down for balance.
- Hold the stretch briefly, then switch legs.
Tips
- Keep your chest lifted and back long even as you hinge forward.
Adjustments
- Place a folded blanket under your kneeling knee for comfort.
Squat Stretch
Duration: 0:30
Drop into a deep squat to open your hips, ankles, and lower back with mindful pressure from your elbows.
Difficulty: Beginner
Instructions
- Stand with feet shoulder-width apart and toes slightly turned out.
- Lower your hips into a deep squat while keeping heels grounded.
- Place elbows inside your knees, press palms together, and hold the stretch.
Tips
- Lift your chest and keep your back straight.
- Use your elbows to gently guide knees outward.
Adjustments
- Place a folded towel under your heels if they lift off the floor.
- Hold onto a chair or wall for balance support.
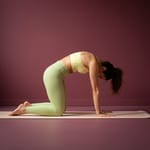
Cat Cow
Duration: 0:30
Flow through cat and cow to mobilize your spine and melt away stiffness one breath at a time.
Difficulty: Beginner
Instructions
- Begin on hands and knees with wrists under shoulders and knees under hips.
- Inhale as you drop your belly, lift your chest, and gaze forward or slightly up.
- Exhale as you round your spine, draw the belly toward the ceiling, and tuck your chin.
- Continue gliding between the two shapes in rhythm with your breath.
Tips
- Move slowly enough that each vertebra gets a moment of attention.
Adjustments
- Keep your head more neutral if your neck prefers less movement.
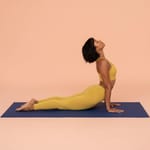
Upward Dog
Duration: 0:30
Press into upward dog to open your chest and stretch the front of your body with strength.
Difficulty: Beginner
Instructions
- Lie on your stomach with legs extended and hands under your shoulders.
- Press into your palms, straighten your arms, and lift your chest and thighs off the floor.
- Relax your shoulders away from your ears and gaze slightly upward.
Tips
- Only your palms and the tops of your feet should touch the floor.
- Keep arms straight without locking your elbows.
Adjustments
- Keep thighs on the floor for a gentler version if needed.
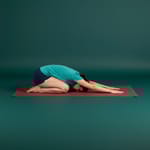
Child's Pose
Duration: 0:30
Melt into child's pose to reset your breath and relax the back with a calming stretch.
Difficulty: Beginner
Instructions
- Start on hands and knees, then widen your knees while keeping big toes touching.
- Sit your hips back toward your heels and reach your hands forward.
- Lower your chest between your thighs and rest your forehead on the floor or a support.
Tips
- Crawl your fingertips forward to deepen the stretch through the sides of your body.
- Let your chest sink toward the ground with each exhale.
Adjustments
- Keep knees closer together if that feels better for your hips.
- Rest your forehead on a block, pillow, or folded blanket if it does not reach the floor.
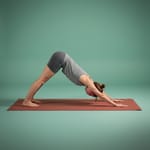
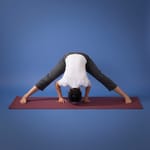
Downward Dog
Duration: 0:30
Press back into downward dog to lengthen your spine, open the shoulders, and stretch the entire backside.
Difficulty: Beginner
Instructions
- Start in tabletop, tuck your toes, and press through your hands to lift hips up and back.
- Straighten your legs as much as feels good while keeping a soft bend in the knees.
- Reach your chest toward your thighs and lengthen through your spine as your heels reach toward the floor.
Tips
- Let your head hang between your arms so your neck relaxes.
- Spread weight evenly between hands and feet.
- Keep knees slightly bent if hamstrings feel tight.
Adjustments
- Bend the knees more deeply or elevate hands on a chair for a lighter option.
- Come onto your forearms or place a block under your hands if wrists need relief.
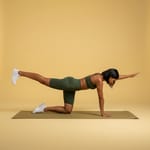
Bird Dog
Duration: 0:30
Pair opposite arm and leg reaches to build a rock-solid core and graceful balance.
Difficulty: Beginner
Instructions
- Set up on all fours with shoulders stacked over wrists and hips over knees.
- Brace your core, then extend one arm forward while the opposite leg reaches straight back.
- Hold the long line parallel to the floor and breathe steadily before returning to tabletop.
- Alternate sides with the same calm control.
Tips
- Keep your hips level by pressing the supporting hand and knee firmly into the floor.
- Think about length from fingertips through the heel rather than height.
Adjustments
- Practice lifting just the arm or just the leg until the full variation feels steady.
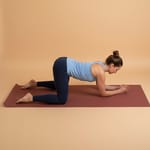
Frog Pose
Duration: 0:30
Ease into frog pose to open your inner thighs and give your hips a deep, satisfying stretch.
Difficulty: Intermediate
Instructions
- Start on hands and knees, then lower to your forearms.
- Slide your knees out to the sides with hips in line with knees and toes turned outward.
- Press your hips back toward your heels to deepen the stretch while breathing steadily.
Tips
- Keep your chest lifted slightly so your spine stays long.
Adjustments
- Bring knees closer together or place blankets under them for less intensity.
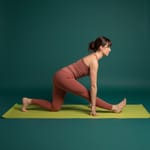
Lizard Pose
Duration: 1:00
Slide into lizard pose to deeply stretch your hips, groin, and hamstrings.
Difficulty: Intermediate
Instructions
- Start in tabletop, then step one foot outside the same-side hand.
- Lower your hips toward the floor and extend the back leg straight behind you, knee and top of the foot resting on the mat.
- Keep your chest lifted as you breathe into the stretch.
Tips
- Let your hips relax and sink toward the floor.
- Lift the back knee and come onto forearms for more intensity when you are ready.
Adjustments
- Use yoga blocks under your hands if the floor feels far away.
Butterfly
Duration: 0:30
Drop into butterfly pose to open the hips and groin while you breathe space into tight muscles.
Difficulty: Beginner
Instructions
- Sit tall with legs extended, then bend your knees and bring the soles of your feet together.
- Hold your feet or ankles and let your knees fall out to the sides.
- Press the knees gently toward the floor while keeping the spine long.
Tips
- Use your elbows to nudge the thighs downward only if it feels comfortable.
- Lift through the chest and avoid rounding your back.
Adjustments
- Place cushions under your thighs when the hips need extra support.
- Sit on a folded blanket to elevate your seat and create more ease.
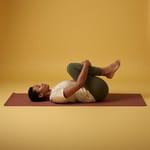
Knees-to-Chest
Duration: 0:30
Hug your knees to your chest to release the lower back and gently stretch the hips.
Difficulty: Beginner
Instructions
- Lie on your back with legs extended and arms by your sides.
- Bend both knees and draw them toward your chest.
- Wrap your arms around your shins and hug the knees in, breathing deeply.
Tips
- Let your head and neck relax on the floor.
- Keep your lower back gently pressing into the mat.
Adjustments
- Hold behind your thighs instead of the shins if that feels better for your body.
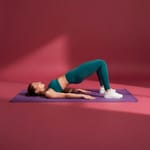
Bridge
Duration: 0:30
Lift into a grounded bridge to awaken glutes and hamstrings while giving your spine a friendly stretch.
Difficulty: Beginner
Instructions
- Lie on your back with knees bent, feet hip-width, and arms relaxed by your sides.
- Press through both heels to raise your hips, creating a straight line from knees to shoulders.
- Hold the lift with glutes fired up and breathe into your ribs before lowering with control.
Tips
- Squeeze the glutes at the top so the work stays in the backside instead of the low back.
- Keep ribs down and core engaged to prevent excessive arching.
Adjustments
- Lift the hips to a halfway point if you want a lighter option.
- Rest your head on a folded towel when the neck needs extra support.
Pelvic Tilt Press
Duration: 0:30
Use a gentle pelvic tilt to teach your lower back how to relax and your core how to engage.
Difficulty: Beginner
Instructions
- Lie on your back with knees bent and feet flat on the floor.
- Engage your core to tilt your pelvis upward and press your lower back into the mat.
- Keep arms relaxed by your sides and hold the position for a breath before releasing.
Tips
- Draw your navel toward your spine to initiate the movement.
- Let your glutes stay soft so the action comes from your core.
Adjustments
- Perform the same motion standing with your back against a wall if the floor feels uncomfortable.
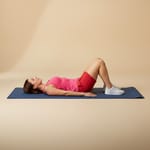
Lying Figure Four
Duration: 1:00
Ease into a lying figure four to release tight glutes and soothe your lower back.
Difficulty: Beginner
Instructions
- Lie on your back with knees bent and feet flat on the floor.
- Cross one ankle over the opposite thigh just above the knee.
- Lift the bottom leg and clasp hands behind the thigh, gently pulling the legs toward your chest.
Tips
- Relax your head and shoulders on the floor.
- Keep your lower back pressing gently into the mat.
Adjustments
- Loop a strap behind your thigh if reach is an issue.
- Leave the bottom foot on the floor for a lighter stretch.

Reclined Butterfly
Duration: 0:30
Lie back and let your knees fall wide to gently open your hips and ease your spine.
Difficulty: Beginner
Instructions
- Lie on your back with knees bent and feet flat.
- Bring the soles of your feet together and allow knees to fall out to the sides.
- Rest your arms by your sides with palms facing up and breathe into the stretch.
Tips
- Let gravity open your hips without forcing them.
Adjustments
- Place cushions or blocks under your thighs for support if needed.
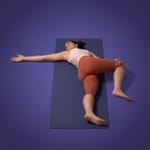
Spinal Twist
Duration: 1:00
Twist gently on your back to stretch your spine, chest, and glutes all at once.
Difficulty: Beginner
Instructions
- Lie on your back with legs extended and arms by your sides.
- Bend one knee and place the foot on the floor.
- Lower the bent knee across your body toward the opposite side while your torso and hips twist.
- Place your opposite hand on the outside of the bent knee and extend the other arm out to the side.
Tips
- Keep both shoulders grounded on the floor.
Adjustments
- Support the bent knee with a cushion or block if needed.
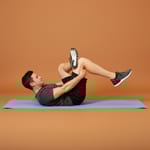
Happy Baby
Duration: 0:30
Rock into happy baby to soothe your lower back and open your hips with a playful stretch.
Difficulty: Beginner
Instructions
- Lie on your back with knees bent and feet flat.
- Lift your feet and draw knees toward your armpits.
- Grab the outer edges of your feet and gently pull your knees toward the floor while keeping your low back grounded.
Tips
- Press your tailbone toward the floor to keep the lower back happy.
- Relax your shoulders and jaw while you breathe.
Adjustments
- Hold your ankles or calves if reaching your feet is a stretch today.
Dynamic Support
Stand slowly and notice how connected and responsive your entire pelvic region feels. This is functional pelvic floor health developed through movement.
Include this dynamic flow regularly for pelvic floor support that integrates into your overall movement practice. The flowing approach creates resilience you can feel in everything you do.


